19.04.2023
EBPF-BASED NETWORKING, OBSERVABILITY, SECURITY
Using Cilium for Kubernetes networking and observability
In this article, we'll provide an introduction to Cilium, a networking solution for Kubernetes that uses eBPF for high-performance networking, security, and observability tasks. We cover the installation of Cilium, network policy configuration, and using Hubble for observability.
Table of contents
Introduction to Cilium and its use in Kubernetes
Cilium is a networking solution for Kubernetes that provides advanced networking and security features. It uses eBPF to perform high-performance networking, security and observability tasks within Kubernetes.
In this article, we’ll explore how to use Cilium for Kubernetes networking. We will cover the basics of setting up Cilium in a cluster, configuring network policies and using Hubble for observability. We’ll also discuss best practices for using Cilium in production environments and troubleshooting common issues. Let’s get started by installing Cilium to our Kubernetes cluster!
Note: We recommend using kind to try this out on your local machine. K3d (which uses k3s under the hood) does not ship bash in its node images, causing the cilium installation to fail.
Installing Cilium
First of all, we need to install the Cilium CLI as described in the documentation.
Once the CLI installation is finished, we can install Cilium to our cluster by running:
$ cilium install
This will install Cilium to the cluster pointed to by our current kubectl context. To verify a working installation, we use:
$ cilium status --wait
The output should look something like this:
/¯¯\
 /¯¯\__/¯¯\    Cilium:         OK
 \__/¯¯\__/    Operator:       OK
 /¯¯\__/¯¯\    Hubble:         disabled
 \__/¯¯\__/    ClusterMesh:    disabled
    \__/

DaemonSet         cilium             Desired: 1, Ready: 1/1, Available: 1/1
Deployment        cilium-operator    Desired: 1, Ready: 1/1, Available: 1/1
Containers:       cilium             Running: 1
                  cilium-operator    Running: 1
Cluster Pods:     0/3 managed by Cilium
Image versions    cilium             quay.io/cilium/cilium:v1.12.5@sha256:06ce2b0a0a472e73334a7504ee5c5d8b2e2d7b72ef728ad94e564740dd505be5: 1
                  cilium-operator    quay.io/cilium/operator-generic:v1.12.5@sha256:b296eb7f0f7656a5cc19724f40a8a7121b7fd725278b7d61dc91fe0b7ffd7c0e: 1
If everything looks good, we can verify proper network connectivity by running
$ cilium connectivity test
This will create a dedicated namespace and run some tests on predefined workloads in order to test the cluster network connection.
The successful output looks like this:
All 31 tests (151 actions) successful, 0 tests skipped, 1 scenarios skipped.
If all the tests ran successfully, congratulations! We have successfully installed Cilium to our Kubernetes cluster!
OUR PODCAST: TOOLS FOR THE CRAFT
E3: Deep dive into Getdeck
Michael and Robert are introducing and demonstrating Getdeck as well as comparing local and remote Kubernetes and preproduction clusters
More editions of our podcast can be found here:
Configuring network policies with Cilium
Network policies in Kubernetes are used to control and filter traffic. By default, any pod running in a cluster can communicate with any other pod, which might be insecure depending on the setup. Using network policies, we can implement rules that only allow traffic that we explicitly want to allow. Cilium allows us to set rules on the HTTP level, which decouples network rules from our application code.
Now that Cilium runs in our cluster, let’s put it to the test by applying some network policies to specify what traffic is allowed inside the cluster as well as ingressing/egressing.
The commonly used “default-deny-ingress” policy can be implemented with Cilium like this:
apiVersion: "cilium.io/v2"
kind: CiliumNetworkPolicy
metadata:
  name: "deny-all-ingress"
spec:
  endpointSelector:
    matchLabels:
  ingress:
  - {}
Since the matchLabels key is empty, this will be applied to every endpoint, effectively locking down any ingress traffic within the cluster.
We need our services to communicate with one another, therefore we add a policy that specifically allows ingress traffic between two services.
A simple “ingress-allow” policy could look something like this:
apiVersion: "cilium.io/v2"
kind: CiliumNetworkPolicy
metadata:
  name: "ingress-allow"
spec:
  endpointSelector:
    matchLabels:
      role: backend-api
  ingress:
  - fromEndpoints:
    - matchLabels:
        role: client
This network policy will allow all ingress traffic from endpoints with the label role: client and that connect to endpoints with the label role: backend-api.
Moving up the OSI model layers, we can also lock down HTTP methods and paths like this:
apiVersion: "cilium.io/v2"
kind: CiliumNetworkPolicy
metadata:
  name: "rule1"
spec:
  description: "Allow HTTP GET /api from app=client to app=api"
  endpointSelector:
    matchLabels:
      app: api
  ingress:
  - fromEndpoints:
    - matchLabels:
        app: client
    toPorts:
    - ports:
      - port: "80"
        protocol: TCP
      rules:
        http:
        - method: "GET"
          path: "/api"
This will allow incoming HTTP traffic from endpoints labeled with app: client to endpoints labeled with app: api, as long as the HTTP method is GET, and the path is “/public”. Requests to ports other than 80 will be dropped, while other HTTP verbs and other paths will be rejected.
Using Cilium for observability
Cilium Hubble is a powerful observability tool that provides deep insights into the network traffic and security of a Kubernetes cluster. In this section, we will explore how to set up and use Hubble for observability.
Setting up Hubble
To use Hubble, we need to deploy it in our Kubernetes cluster as follows:
$ cilium hubble enable --ui
If we run “cilium status” again, we’ll see that Hubble is enabled and running.
To make use of the data that’s being collected, we install the Hubble CLI as described in the documentation. Once the installation is complete, we can verify Hubble API access by first creating a port forward for hubble and then using the Hubble CLI to inspect Hubble status and to query the API, like this:
$ cilium hubble port-forward&
$ hubble status
$ hubble observe
Apr  4 07:14:29.119: 10.244.0.166:37906 (host) -> cilium-test/echo-same-node-9f8754876-ns7tx:8181 (ID:2357) to-endpoint FORWARDED (TCP Flags: ACK)
Apr  4 07:14:29.120: 10.244.0.166:41980 (host) <- cilium-test/echo-same-node-9f8754876-ns7tx:8080 (ID:2357) to-stack FORWARDED (TCP Flags: ACK, PSH)
Apr  4 07:14:29.121: 10.244.0.166:41980 (host) -> cilium-test/echo-same-node-9f8754876-ns7tx:8080 (ID:2357) to-endpoint FORWARDED (TCP Flags: ACK, FIN)
Apr  4 07:14:29.121: 10.244.0.166:41980 (host) <- cilium-test/echo-same-node-9f8754876-ns7tx:8080 (ID:2357) to-stack FORWARDED (TCP Flags: ACK, FIN)
Apr  4 07:14:29.121: 10.244.0.166:41980 (host) -> cilium-test/echo-same-node-9f8754876-ns7tx:8080 (ID:2357) to-endpoint FORWARDED (TCP Flags: ACK)
Apr  4 07:14:30.119: 10.244.0.166:41986 (host) -> cilium-test/echo-same-node-9f8754876-ns7tx:8080 (ID:2357) to-endpoint FORWARDED (TCP Flags: SYN)
Apr  4 07:14:30.119: 10.244.0.166:41986 (host) <- cilium-test/echo-same-node-9f8754876-ns7tx:8080 (ID:2357) to-stack FORWARDED (TCP Flags: SYN, ACK)
Apr  4 07:14:30.119: 10.244.0.166:41986 (host) -> cilium-test/echo-same-node-9f8754876-ns7tx:8080 (ID:2357) to-endpoint FORWARDED (TCP Flags: ACK)
Apr  4 07:14:30.119: 10.244.0.166:37912 (host) -> cilium-test/echo-same-node-9f8754876-ns7tx:8181 (ID:2357) to-endpoint FORWARDED (TCP Flags: SYN)
Apr  4 07:14:30.119: 10.244.0.166:37912 (host) <- cilium-test/echo-same-node-9f8754876-ns7tx:8181 (ID:2357) to-stack FORWARDED (TCP Flags: SYN, ACK)
Apr  4 07:14:30.119: 10.244.0.166:37912 (host) -> cilium-test/echo-same-node-9f8754876-ns7tx:8181 (ID:2357) to-endpoint FORWARDED (TCP Flags: ACK)
Apr  4 07:14:30.119: 10.244.0.166:37912 (host) -> cilium-test/echo-same-node-9f8754876-ns7tx:8181 (ID:2357) to-endpoint FORWARDED (TCP Flags: ACK, PSH)
Apr  4 07:14:30.119: 10.244.0.166:41986 (host) -> cilium-test/echo-same-node-9f8754876-ns7tx:8080 (ID:2357) to-endpoint FORWARDED (TCP Flags: ACK, PSH)
Apr  4 07:14:30.120: 10.244.0.166:37912 (host) <- cilium-test/echo-same-node-9f8754876-ns7tx:8181 (ID:2357) to-stack FORWARDED (TCP Flags: ACK, PSH)
Apr  4 07:14:30.120: 10.244.0.166:37912 (host) <- cilium-test/echo-same-node-9f8754876-ns7tx:8181 (ID:2357) to-stack FORWARDED (TCP Flags: ACK, FIN)
Apr  4 07:14:30.120: 10.244.0.166:37912 (host) -> cilium-test/echo-same-node-9f8754876-ns7tx:8181 (ID:2357) to-endpoint FORWARDED (TCP Flags: ACK, FIN)
Apr  4 07:14:30.120: 10.244.0.166:37912 (host) -> cilium-test/echo-same-node-9f8754876-ns7tx:8181 (ID:2357) to-endpoint FORWARDED (TCP Flags: ACK)
Apr  4 07:14:30.121: 10.244.0.166:41986 (host) <- cilium-test/echo-same-node-9f8754876-ns7tx:8080 (ID:2357) to-stack FORWARDED (TCP Flags: ACK, PSH)
Apr  4 07:14:30.121: 10.244.0.166:41986 (host) -> cilium-test/echo-same-node-9f8754876-ns7tx:8080 (ID:2357) to-endpoint FORWARDED (TCP Flags: ACK, FIN)
Apr  4 07:14:30.121: 10.244.0.166:41986 (host) <- cilium-test/echo-same-node-9f8754876-ns7tx:8080 (ID:2357) to-stack FORWARDED (TCP Flags: ACK, FIN)
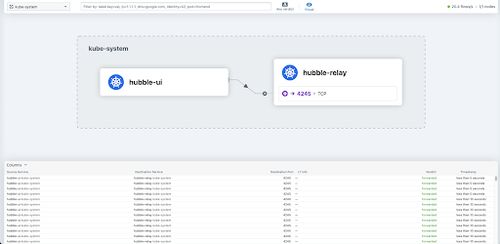
If you like graphical user interfaces, you can also deploy Hubble UI to your cluster. Hubble UI gives you access to a graphical service map that can be used to visually inspect traffic within the cluster. For our example setup, Hubble UI looks like this:
Conclusion
In conclusion, Cilium offers a robust networking solution for Kubernetes, allowing users to enforce precise network policies and keep track of network activity in real-time. Its cloud native design and eBPF-based architecture make Cilium a top pick for users seeking advanced networking functionalities in their Kubernetes setups.
Going further
Cilium offers way more features than we can cover in this post, so here’s a short writeup of what else Cilium is capable of.
Cluster Mesh
With cluster mesh, we can extend networking paths across multiple Kubernetes clusters, allowing endpoints in connected clusters to communicate with each other while also enforcing network policies.
Service Mesh
Cilium service mesh aims to replace more traditional service mesh solutions like Linkerd. It has one key difference, though: While Linkerd relies on sidecar proxies to manage traffic between pods, Cilium service mesh uses eBPF on the node level to manage traffic, improving performance, reducing load and further decoupling the service mesh from the actual workloads.