Table of Contents

2022-03-30
More local Kubernetes DevelopmentAn alternative to Telepresence 2: Gefyra
There are a couple of different approaches to develop locally using Kubernetes. One very well-known tool for a few different scenarios ranging from local to remote Kubernetes application development is Telepresence. Although Telepresence 2 comes with great features, we have not been completely satisfied with the extent of supported use cases. So we decided to build our own solution. May we introduce: Gefyra.
Introduction
For local Kubernetes development there are few possibilities to make writing code right within Kubernetes feasible. One of the simpler solutions with a limited feature set are host path mappings (such as the local-path-provisioner in K3d) in Kubernetes. Among others, the biggest concern with that is the missing portability of that approach to remote Kubernetes development scenarios.
Hence, we started to use Telepresence (back in the days in version 1) in all of our development infrastructures. That empowered our teams to utilize the same tool regardless of their development setups: either locally or remotely running Kubernetes environments. The Unikube CLI offered this functionality to their users by building on top of the free open source parts of Telepresence 2.
Unfortunately, we have always had troubles with Telepresence. We experienced quite some issues on different platforms and environments. That’s why we decided to create an alternative to Telepresence 2 and started the development of Gefyra.
Today, Gefyra is part of the Unikube CLI and replaces Telepresence as the default development mechanism while having the same or even better experience. The following article will go into detail why we decided to start Gefyra and what the biggest differences between Telepresence and Gefyra are.
Working with Telepresence
Telepresence 2 is a very comprehensive tool to create a seamless Kubernetes-based development experience while having established equipment available. These include favorite IDEs (integrated development environments), debugging tools, code hot reloading, environment variables and so on. Using Telepresence comes with the great advantage of having developers work with Kubernetes from the beginning without leaving too far from the familiar surroundings.
The makers of Telepresence 2 are addressing a new paradigm, new development workflow and development environment: it essentially means that Kubernetes is becoming part of the software it runs. And so the development workflow and tooling must be adapted, too. This is concisely written down here.
Additionally to the free part, Telepresence offers commercial only features in combination with the Ambassador Cloud, for example preview links. They allow sharing of development states even within a production(-near) environment with other teams.
Our teams have only been using the free parts and so we cannot report experiences with using the commercial version.
Challenges and issues with Telepresence 2
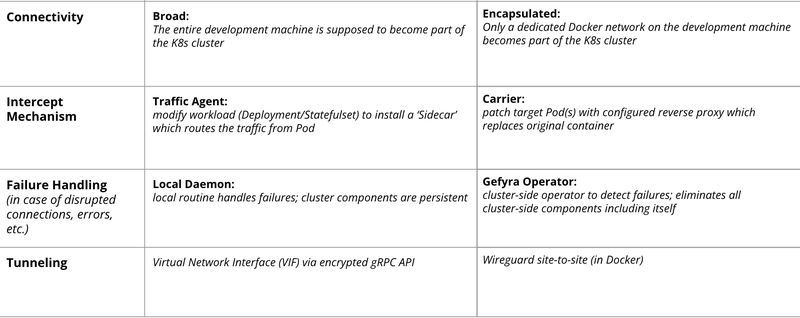
One of the biggest challenges of Telepresence 2 is to make “your development machine to become part of the cluster”. Running on Windows, MacOS and Linux, that leads to a lot of platform specific logic, for example with the DNS resolvers. Creating special DNS and interface rules plus maintaining them as the operating systems evolve seems very difficult. In fact, it always requires granting sudo-privileges in order to connect to a (even local) Kubernetes cluster.
We found ourselves and users of the Unikube CLI to face timeout issues with no relatable reason. A very frustrating situation.
Another architectural decision of the Telepresence team was to modify the workload components (e.g. Deployments) of the applications in question upon connection. That approach opens up great opportunities and features, but can lead to inconsistencies and residues when not disconnecting properly (which is often the case for us). Once the workloads are modified they cannot be reset to their original states without applying the workload descriptors again. Cleaning up the Telepresence components became a frequent task in our development clusters.
Bypassing of containers
However, one of the major downsides of Telepresence 2 is their agent-concept which incorporates a dedicated sidecar component which can intercept running Pods. No matter which port is the target for the intercept, the traffic from the services is directly routed to Telepresence’s agent (which got installed to the Pod) effectively bypassing all other containers (i.e. sidecars). From our perspective, this is the exact opposite of writing Cloud Native software as it leaves one of the most promising Kubernetes patterns disregarded.
Gefyra: our alternative to Telepresence 2
After placing a couple of issue tickets on GitHub and being part of their community calls, we decided to build an alternative to Telepresence 2 with a smaller featureset and a simplified architecture. Gefyra is based on other popular open source projects, such as Wireguard or Nginx. We are committed to create something more robust and to support a wider range of actual development scenarios, including all Kubernetes patterns.
More control with 4 operations
Gefyra does not try to make your entire development machine to be part of the Kubernetes cluster, instead it only connects a dedicated Docker network. That ought to be more controllable and portable across different operating systems. In addition, this approach does not need to grant sudo-privileges if the development user account has access to the Docker host.
Gefyra declares four relevant operations: up, down, run, bridge. Similar to Telepresence 2 one has to connect to the development cluster. Gefyra sets up the required cluster components. A developer can run a container which behaves to be part of the cluster while having it on the local Docker host. The bridge operation redirects traffic that hits a container in a certain Pod and proxies these requests to a local container instance. Of course, down removes all cluster components.
In contrast to Telepresence, Gefyra does not modify the workload manifest in the cluster. In case something goes wrong, deleting the Pod will restore its original state.
If you want to know more about Gefyra’s architecture, please head over to the documentation: https://gefyra.dev/en/technical-details/architecture
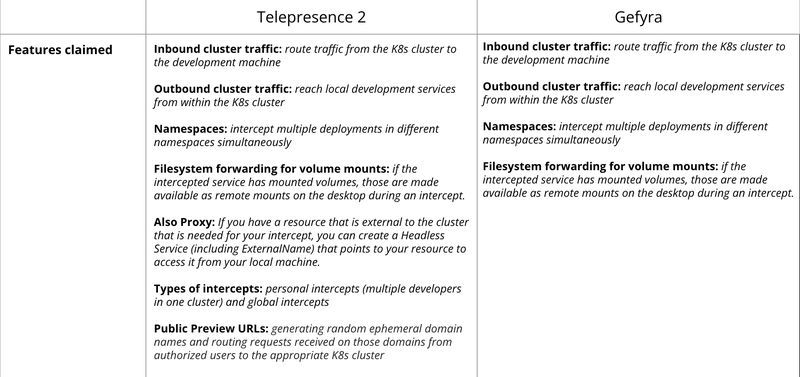
The following table compares the approaches of Telepresence 2 and Gefyra side-by-side:
Our Kubernetes podcast
Tools for the Craft: Navigating the Kubernetes ecosystem
Michael and Robert are talking in depth about the ins and outs of local Kubernetes development and also provide some real coding examples.
More editions of our podcast can be found here:
Show moreUsing Gefyra: an Overview
If you want to use Gefyra then simply head over to the installation guide: https://gefyra.dev/en/quick-start/installation. There are installation candidates for Windows, Linux and MacOS with different installation methods. Once the executable is available you can run
Gefyra actions.
But before you go on, please make sure you have a working kubectl connection set. If not, or you simply want to work with a local Kubernetes cluster, you can easily create one using k3d.
Also, when you tried Gefyra, we would really appreciate feedback and have prepared a quick questionnaire. This should not take you more than 3 minutes and really helps us.
Set a UDP Connection
Important: In order to use Gefyra, you’ll need a UDP connection. Depending on your cluster connectivity (if it is not local) you have to set appropriate firewall rules for port UDP/31820.
For a working local k3d cluster (k3d version >= 5) you run:
k3d cluster create mycluster --agents 1 -p 8080:80@agent:0 -p 31820:31820/UDP@agent:0
First thing to do is connect Gefyra with the cluster running
- [INFO] Installing Gefyra Operator
- [INFO] Pulling image "quay.io/gefyra/operator:latest"
- [INFO] Successfully pulled image "quay.io/gefyra/operator:latest" in 638.596569ms
- [INFO] Pulling image "quay.io/gefyra/stowaway:latest"
- [INFO] Successfully pulled image "quay.io/gefyra/stowaway:latest" in 7.092248247s
- [INFO] Operator became ready in 15.2887 seconds
- [INFO] Creating Docker network
- [INFO] Created network 'gefyra' (156bace408)
Now, Gefyra is connected to the cluster.
All you have to do now is to run a local container with:
- [INFO] Container image 'pyserver:latest' started with name 'mypyserver' in Kubernetes namespace 'default'
Mind the -n default which places the container “mypyserver” in the Kubernetes namespace of your choice. There are a couple of options available for the run action, for example you can ask Gefyra to copy the environment from a container within the cluster.
This is handy if you need to connect to a cluster-based database for which a container within the cluster already holds the parameters.
If you want to intercept a cluster-based container in a pod of a certain deployment, you can do so with the bridge action.
- [INFO] Creating bridge for Pod hello-nginxdemo-7d648bd866-xsd28
- [INFO] Waiting for the bridge(s) to become active
- [INFO] Bridge mypybridge established
This action will make the “hello-nginx” container in all pods of the deployment “hello-nginxdemo” to redirect their traffic to the local instance of “mypyserver”.
Now, you are able to write code or make other changes and instantly see it interacting with other Kubernetes-based components.
To clean up everything you simply run:
To find even more examples please check out https://gefyra.dev.
- [INFO] Removing running bridges
- [INFO] Uninstalling Operator
- [INFO] Removing Cargo
- [INFO] Stopping remainder container from Gefyra network
- [INFO] Removing Docker network
- [INFO] Removed 1 docker networks with name 'gefyra'
Summary
In this blog post, we introduced our Telepresence 2 alternative Gefyra. Although it does not cover all (enterprise) features of Telepresence at the moment, it is already usable for the core requirements of real Cloud Native development. We hope that, from a technical perspective, the differences will make the technology less prone to failures caused by the host system. In addition, the clear UDP based connection requirements will make the life of corporate infrastructure teams much easier, as the underlying connection is much more comprehensible. However, in terms of features Gefyra is still far behind Telepresence.
Gefyra in Unikube
Gefyra will replace Telepresence 2 in the upcoming release of the Unikube CLI and become the new standard provider for the switch operation. This will significantly reduce the issues that our users are experiencing with Telepresence and improve the overall performance. Moreover, since we are now in control of the entire stack, the development team of Unikube will finally be able to help out with all problems related to this operation. We’re looking forward to receiving feedback.
Do you have questions or an opinion? With your GitHub account you can let us know...
Here are a few articles that you might also find interesting:


django-o365: A Modern Mail Backend for Django and Exchange Online
django-o365 is an open-source mail backend for Django that enables sending emails via Exchange Online using OAuth 2.0. Born from real-world project requirements, this package is aimed at teams using Microsoft 365 who want to implement their email dispatch securely, maintainably, and without workarounds. This article provides an overview of the motivation, features, and usage.


More Blog Articles
Discover exciting insights and practical tips in our latest blog posts. From Python and Rust to Kubernetes, Django security, and frontend topics – find valuable knowledge for your projects here. Click to explore all articles!