Table of Contents

2023-03-08
Some experiences with Docker Desktop development and KubernetesDocker Desktop and Kubernetes
In this article, we will take a glance at Docker Desktop in 2023 and focus on how developers can work with Kubernetes. Our team at Blueshoe just recently published a custom Docker Desktop extension for our open-source development tool Gefyra. We want to provide the most convenient developer experience (“DX”) for Kubernetes-based development workflows and Docker Desktop may be a good foundation. So let’s see.
Installation
The installation of Docker Desktop is quite simple for all major platforms. You will find installation candidates for Apple’s new silicon and Intel-based chipsets, too. That’s convenient and will be easy for any developer that wants to start a journey with Container-based development.
However, as someone who works with Linux (specifically with Ubuntu), it bothers me a bit to download a >500 MiB install package from the browser to my machine. I usually want to add a software repository and with that automatically configure update strategies. If I wanted to update Docker Desktop (yes, Docker Desktop tells me in the UI) I have to load another installation package from the website and run the updater accordingly.
At its core, the idea is simple: running a logical or "virtual" Kubernetes cluster within a physical or "host" Kubernetes cluster. This concept brings a new layer of flexibility, allowing developers to spin up isolated environments quickly without the overhead of managing multiple physical clusters. With this, developers can replicate production environments, experiment safely, and optimize applications for the Kubernetes ecosystem.
VM backend on all platforms needed
Docker Desktop needs a virtual machine (VM) backend on all platforms, including Linux. That is required because software containers are a Linux-native technology and thus not directly supported on Windows and Mac. On Windows, you can either use the WSL2 subsystem (which is a lightweight VM with a limited Hyper-V toolset to run the Linux kernel) or a Hyper-V backend. Depending on the Windows edition the first or second option is recommended. On macOS, Docker Desktop runs with HyperKit, a toolkit for embedding hypervisor capabilities into an application. On Linux it uses QEMU.
The question of why Docker Desktop exactly needs a VM on Linux is answered here. I found the raised points relatable, although it means I do have to sacrifice performance.
At least on Linux, the alternative is to run only the Docker daemon (a.k.a Docker engine). That allows me to run and manage containers with system-level performance. It’s a huge advantage compared to other platforms. It doesn’t seem possible to use Docker Desktop with a native Docker daemon, though. It would be the best of both worlds, the features and convenience coming with Docker Desktop and the performance of a native Docker engine. Well, this option is probably never going to happen.
Performance & convenience
Speaking about convenience: What exactly is the developer experience with Docker Desktop about? Let me start with the most important disadvantage in 2023.
Because I work with the Docker CLI (together with the Docker engine) in Linux on a daily basis I am very used to it. Yet, the Docker daemon was not (prominently) available on Windows or macOS and was only installable via the Docker Desktop-VM on these platforms. In the past, my team at Blueshoe experienced significant differences in the speed of the container execution and the resource consumption of the VM-based workaround of Docker Desktop. For example, we used to run local Kubernetes clusters with k3d, based on Docker containers, which was fine for Linux users, but nearly impossible for Mac users, even with comparable or better hardware specs (i.e. CPU, memory, etc.).
Some real computing power needed
The startup time of Docker Desktop, especially on MacOS, is very long and the container performance is, frankly, quite poor. Since you can only adjust the system resources for the entire VM you have to cut a lot of available capacity from your host system in favor of the Docker VM. The downside is, you get a very unflexible resource allocation. If you put much capacity in the Docker VM, you will probably miss it on your host and vice versa. Only a very powerful machine (like more than 8 cores, and more than 16 GiB of memory) will be enough for serious container-based development tasks. In reality, you also run a resource-demanding IDE, a web browser with many open StackOverflow tabs, some instant messenger, and more on your development machine. This will eat up a lot of capacity, too. Running Docker Desktop comes with another huge demand that will most probably bend a common development computer to its knees. That sucks a lot of the convenience and developer experience of Docker Desktop.
Starting the integrated Kubernetes distribution takes very long, too. This got a lot better with the WSL2 integration on Windows. I suspect that the resource allocation of WSL2 is much more flexible than any Hyper-V-based VMs. On MacOS, this is still very time-consuming and frustrating if done multiple times a day.
Much better than just a CLI
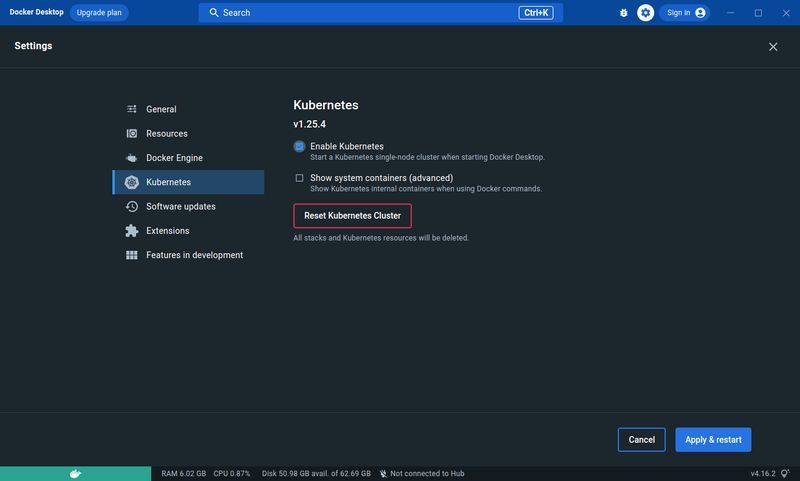
But leaving the performance aside, Docker Desktop presents a very clean and intuitive graphical user interface. In my opinion, it’s very easy if you already worked with containers before. For example, it’s a great advantage to jump from logs to interactive terminals to environment variables - all at a click of a button. That’s a huge advantage compared to the plain CLI (even if you are very fast with it) and feels more like a development tool that was not designed to “just run a software container”. Do you want to work with Kubernetes? - Fine. Just activate the checkbox in the settings and wait for Kubernetes to become available.
All you additionally need is kubectl, the primary interface to any Kubernetes cluster. The kubeconfig is automatically prepared with the right context so that kubectl will be working out of the box.
Setting up Docker Desktop Kubernetes
Working with Kubernetes in Docker Desktop requires a rather powerful development machine. Aside from that requirement, you may face the limitation that there is only one Kubernetes version available: the one shipping with the installed Docker Desktop version. That may be a problem if you want to match the specific Kubernetes version of your production system (speaking about dev/prod parity).
If you want to install a specific Kubernetes version check out this article. You could use minikube with the --kubernetes-version flag and the Docker driver to install any available Kubernetes version on Docker Desktop. That might be even faster regarding the boot-up time.
The Kubernetes distribution coming with Docker Desktop is unopinionated. That’s an advantage if you want to work with a production close setup. However, the downside is that developers have to provide every building block by themselves. For example, there is no ingress controller available by default. Compared to k3d, it takes a few additional steps to make it available:
Which ingress controller should be used?
You can choose from a range of different ingress controllers for Kubernetes. The platform “learnk8s” maintains a very comprehensive spreadsheet that compares basically all Kubernetes ingress controllers: https://docs.google.com/spreadsheets/d/191WWNpjJ2za6-nbG4ZoUMXMpUK8KlCIosvQB0f-oq3k/edit#gid=907731238
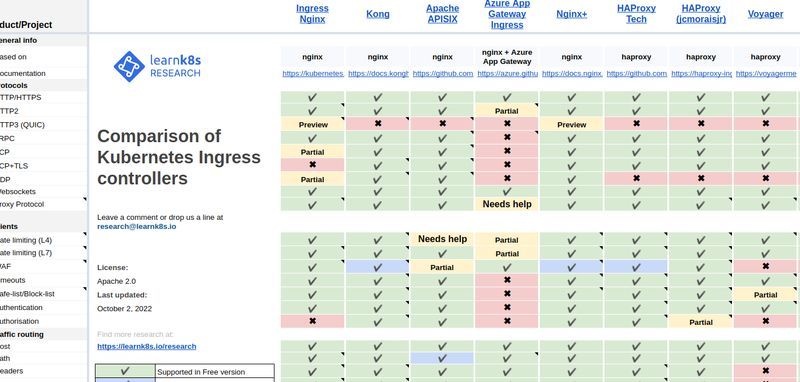
This should not be a very relevant decision made by developers though. If you still don’t know which ingress controller to use with Docker Desktop, chances are you can choose any of them. I’d personally recommend the Ingress-Nginx controller which also happens to be an official Kubernetes project.
Install Ingress-Nginx to your Docker Desktop Kubernetes
To install it, you first need to make sure your kubeconfig context is set to docker-desktop. In a terminal, you can run the following command:
> kubectl config current-context

docker-desktop
If this command tells something different, set the context to docker-desktop with:
> kubectl config use-context docker-desktop

Switched to context "docker-desktop".
Then, just apply the ingress controller configs for Kubernetes, like so:
> kubectl apply -f https://raw.githubusercontent.com/kubernetes/ingress-nginx/controller-v1.6.4/deploy/static/provider/cloud/deploy.yaml
You can check the ingress-controller with this command and it should tell the following:
> kubectl -n ingress-nginx get pod

  NAME                                        READY   STATUS      RESTARTS   AGE
  ingress-nginx-admission-create-szn97        0/1     Completed   0          70s
  ingress-nginx-admission-patch-plpcx         0/1     Completed   0          70s
  ingress-nginx-controller-6b94c75599-vpjjd   1/1     Running     0          70s
Et voila, your local Kubernetes cluster is ready to serve real HTTP traffic.
Important: the Kubernetes of Docker Desktop binds directly to the ports of your local machine. That means the ingress-controller we just installed will be started on port 80 which must be free on your machine.
Testing the Ingress-Controller with a little Demo App
Let’s confirm it working by applying some test workload and exposing it with an ingress object:
> kubectl apply -f https://raw.githubusercontent.com/gefyrahq/gefyra/main/testing/workloads/hello_dd.yaml
(This is the “hello-nginx” application, from our Kubernetes development tool Gefyra)
If you check the ingress objects with:
> kubectl get ingress
NAME CLASS HOSTS ADDRESS PORTS AGE
hello-ingress hello. 127.0.0.1.nip.io 80 7s
you will find the hello-ingress object to be reachable on http://hello.127.0.0.1.nip.io (this requires nip.io Domains to work in your current network; if not look for “DNS rebind protection”). Once you point your browser to that address you will be welcomed with the Hello Nginx screen.
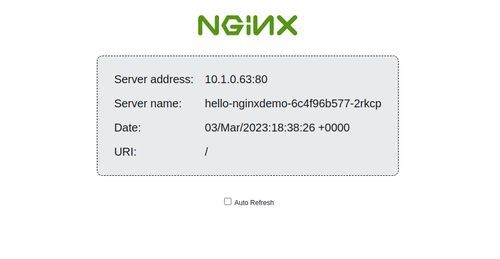
It tells a bit about your cluster: the pod name of the process running this simple page and the IP address of the pod.
What does the Docker Desktop GUI look like?
Going back to Docker Desktop, you will find all containers we just installed to Kubernetes also in the “Containers“ section.

By clicking on the “View details” button a the “k8s_hello-nginx_hellp-nginxdemo” container you will be presented with the logs and much other useful information. You can even drop into an interactive shell by clicking on the “Terminal” tab.
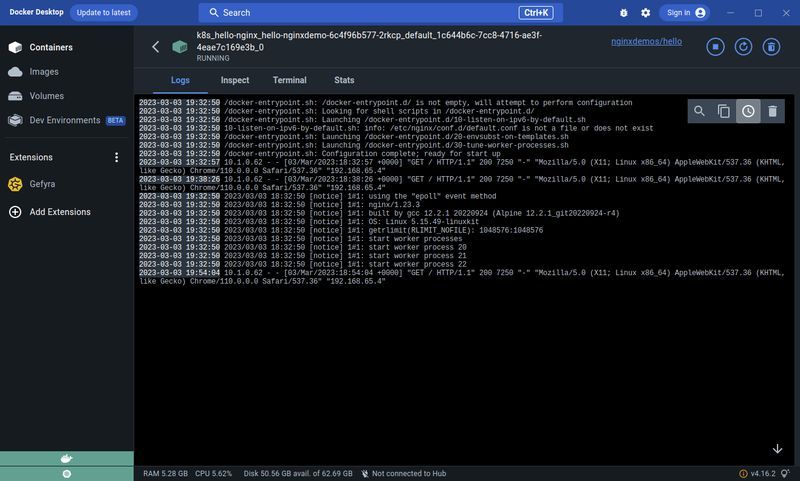
That is very handy if you want to inspect the container state or execute a one-off management command of your application.
OUR PODCAST: TOOLS FOR THE CRAFT
E3: Deep dive into Getdeck
Michael and Robert are introducing and demonstrating Getdeck as well as comparing local and remote Kubernetes and preproduction clusters
More editions of our podcast can be found here:
Show moreWriting Code with Docker Desktop Kubernetes
As a developer, it is just natural that I want to write code and iterate fast. In many modern environments, one will find Kubernetes-based production environments. So it is just consequent that Kubernetes-based development environments are trending.
If there are DevOps putting a lot of effort into writing good Kubernetes configs for all required resources that made up the application, why don’t we take these resources and roll them out to our developers as well?
Let’s say you want to bootstrap a Kubernetes-based development environment. Here is what you need:
- Pull all resources for provisioning a Kubernetes cluster together (e.g. you need Helm charts, Kustomize resources or plain YAML files). If in doubt, ask your DevOps to provide you with guidance.
- Install all components that make up the application to your local Kubernetes cluster (i.e. required databases, caches, indexes, APIs, and other applications). Alternatively, you can just install the components that are really required for your specific application to save computing capacity.
- Make sure everything is running
From here you have basically a few options to set up the development tooling.
Running local container images in Kubernetes
Kubernetes usually pulls images from a container registry, which means you have to push and pull the image we have built after every change. Docker Desktop makes this easy by using dockershim to share the image cache between the Docker engine and Kubernetes.
The dockershim is a component coming with Docker Desktop Kubernetes that translates between the Kubernetes kubelet and the Docker Engine.
This is a huge advantage for developers as they don’t have to push and pull their container images before they can run them in Docker Desktop Kubernetes. This feature is somewhat similar to what you can achieve with k3d, minikube, and kind by importing the container image to their cluster nodes. Yet, with Docker Desktop you literally only need to build the container image as usual and don’t have to import it to a Kubernetes node. So that is even faster than what you get with other local Kubernetes solutions.
If you wanted to modify the output of the “hello-nginx” application from above, then first take a look at the workload specification:
apiVersion: apps/v1
kind: Deployment
metadata:
  name: hello-nginxdemo
spec:
  selector:
    matchLabels:
      app: hello-nginx
  replicas: 1
  template:
    metadata:
      labels:
        app: hello-nginx
      spec:
        containers:
            - name: hello-nginx
            image: nginxdemos/hello
            ports:
            - containerPort: 80
It says the container image running is “nginxdemos/hello”, pulled from the Dockerhub. You can find that information also with Docker Desktop in the “Container” sections (see the screenshot from above).
Now you can either build a new version of that container image with docker build . -t nginxdemos/hello and delete the Kubernetes pod:
> kubectl get pod

NAME                               READY   STATUS    RESTARTS   AGE
hello-nginxdemo-6c4f96b577-2rkcp   1/1     Running   0          51m

> kubectl delete pod hello-nginxdemo-6c4f96b577-2rkcp

pod "hello-nginxdemo-6c4f96b577-2rkcp" deleted
You will get a new pod almost immediately, but this time running your custom container image that you just built.
Instead of reusing the original container image coming with the Kubernetes resource, you could also build a custom container image and name it anything you want. Then, you can simply modify the deployment and run that image:
> kubectl patch deployment hello-nginxdemo -p '{"spec":{"template":{"spec":{"containers":[{"name":"hello-nginx","image":"my-custom-image"}]}}}}'
This will lead to the same result: the pod gets restarted with the new image that you just created. Kubernetes won’t take the effort of pulling the image as the Docker engine you use for building the container image is exactly the same as the one used by Docker Desktop Kubernetes. They share the same image cache and that makes it very convenient to run an arbitrary image in the local cluster.:::
By the way, the container will have all Kubernetes resources and configs available. This makes it very close to the production environment.
Using additional tooling for even faster interaction
If you don’t want to build the container image every time you make a code change, you will need some additional tooling. If you want to attach a debugger to the container process, you won’t be able to do this simply with the local Kubernetes. In addition, if you need to override environment variables (let’s say you want to set a DEBUG flag) this must be done by modifying your Kubernetes configs in the cluster.
Blueshoe created Gefyra for exactly that use case. With it, you can simply docker run …, pardon me, I meant gefyra run … (it is almost similar) your container image without even forcing any Kubernetes pod to reload. That way, you can mount your current working tree into the container and activate the hot-reloading flag in your process (if available). You can easily set environment variables and best of all, expose that container on a dedicated local port to iterate even faster. The container will behave as it would run within a Kubernetes pod (including networking semantics), hence reaching all Kubernetes-based resources such as databases or other applications.
This works with the command line application gefyra or alternatively, developers can take advantage of the Gefyra Docker Desktop extension from the marketplace.
Check out Gefyra and our getting started guide to use it with Docker Desktop Kubernetes or the Docker Desktop extension.
Closing Remarks
Although Docker Desktop makes the development work with Kubernetes simple, there are still a few challenges. The resource requirements are overwhelming, and setting up a cluster that is close to production takes time and knowledge.I created a discussion at Docker's idea board on GitHub to make this process simpler in the future. Maybe it’s picked up and will be realized.
There are a couple of other interesting Docker Desktop extensions already in the marketplace that can improve the development experience even further. Stay tuned for another article in which we want to present existing Kubernetes-based development extensions.
In the long run, I actually don’t see local Kubernetes development as a sustainable option, though. Remote development environments are the future! Getdeck Beiboot will run all Kubernetes-based resources, and with tools like Gefyra, we enable developers to work in a real Kubernetes-based development environment with just a few containers running locally.
If you want to know more about Kubernetes-based development follow me on LinkedIn or drop us a line at Blueshoe.
Do you have questions or an opinion? With your GitHub account you can let us know...
Here are a few articles that you might also find interesting:


django-o365: A Modern Mail Backend for Django and Exchange Online
django-o365 is an open-source mail backend for Django that enables sending emails via Exchange Online using OAuth 2.0. Born from real-world project requirements, this package is aimed at teams using Microsoft 365 who want to implement their email dispatch securely, maintainably, and without workarounds. This article provides an overview of the motivation, features, and usage.


More Blog Articles
Discover exciting insights and practical tips in our latest blog posts. From Python and Rust to Kubernetes, Django security, and frontend topics – find valuable knowledge for your projects here. Click to explore all articles!